Batch BOL/EOL Editing

I needed a way of adding periods to the end of every line in text documents. The text documents in question had 100+ lines, so going through each document and pressing ( END > . > ENTER ) repetitively was not ideal. I needed a program, but after some brief googling I gave up and decided that I needed to write this program. I started my project by getting some advice and direction, here, and I am glad I did or else I would have went with my original plan of working with “regex” 🙁 …

Private Sub Button1_Click(ByVal sender As System.Object, ByVal e As System.EventArgs) Handles Button1.Click
Dim oFile As System.IO.File
Dim oWrite As System.IO.StreamWriter
Dim Needy As String = tbx_main.Text
Dim Added As String = Regex.Replace(Needy, “(\p{P})(?=\Z|\r\n)”, “.”)
oWrite.Write(Added)
oWrite.Close()
oWrite = oFile.CreateText(“C:\Text_to_Speech.txt”)
End Sub

The end result is a little program that adds any desired character(s) to the beginning or end of all lines pasted into its textbox. The code is as follows…

Try
‘Make sure big tbx is not empty
If tbx_main.Text = “” Then
tbx_main.Text = “Please enter text!”
ElseIf tbx_main.Text = “Please enter text!” Then
tbx_main.Text = “Please enter text!”
Else
‘Make sure small tbx is not empty
If tbx_desired.Text = “” Then
tbx_desired.Text = “Char?”
ElseIf tbx_desired.Text = “Char?” Then
tbx_desired.Text = “Char?”
Else
‘Declare: file, stream and savefiledialog
Dim oFile As File
Dim oMyStream As Stream
Dim saveFileDialog1 As New SaveFileDialog
‘Set savefiledialog defaults
saveFileDialog1.Filter = “txt files (*.txt)|*.txt”
saveFileDialog1.FilterIndex = 2
saveFileDialog1.RestoreDirectory = True
‘Run nested code if user presses OK button in dialog
If saveFileDialog1.ShowDialog() = DialogResult.OK Then
oMyStream = saveFileDialog1.OpenFile()
Dim oWrite As New StreamWriter(oMyStream)
For Each LineInput As String In tbx_main.Lines
‘Core Code, add periods to beginning or end
If rbtn_begin.Checked = True Then
‘Beginning
oWrite.WriteLine(tbx_desired.Text + LineInput)
ElseIf rbtn_end.Checked = True Then
‘End
oWrite.WriteLine(LineInput + tbx_desired.Text)
End If
Next
oWrite.Close()
End If
‘Periods added, display success msgbx, close form
MessageBox.Show(“Success: file was created!”)
Me.Dispose()
Me.Close()
End If
End If
Catch exc As Exception
‘Catch Errors, display messagebox
MessageBox.Show(“Error: file was not created!”)
End Try

Sounds useful? If you want to download the program and use it at your own risk, click here.

YouTube Enabled

With the YouTube craze spreading like a wildfire, last summer (’07) I took some time to enable Noteful.COM with YouTube. Users can now visually depict their thoughts using YouTube videos. The code wasn’t hard and thanks to C.K. Sample’s blog (here), it was even easier…

<object type="application/x-shockwave-flash" data="[INSERT VIDEO URL FROM EMBED CODE PROVIDED HERE]" width="400" height="326"><param name="movie" value="[INSERT VIDEO URL FROM EMBED CODE PROVIDED HERE]" /><param name="FlashVars" value="playerMode=embedded" /></object>

With this code I can also allow users to embed Google Videos as well, this would have to be done soon before I fall behind. More and more video streaming sites are hitting the web that are a must for me. Stage6, for example is on the top of my list. If anyone has any advice on this, please comment. 🙂

UPS WorldShip XML Auto Import

I have a new “UPS WorldShip XML Auto Import” osCommerce contribution if anyone is interested… Its actually a few months old, but I never took the time to blog about it. You can find it here on the osCommerce Addons Website… http://addons.oscommerce.com/info/5519.

This contribution allows you to process your UPS Worldship orders with the click of a link. The links are located in the order’s details page.

Your are required to have: UPS Worldship software that can be ordered free here: http://www.ups.com/orderworldship?loc=en_US, an UPS account to order and use the UPS Worldship software, and a daily UPS pick-up required for use of the software.

Also, you must have UPS Worldship running, specifically… you must have their “XML Auto Import” running. Instructions straight from UPS: http://ups.com/media/en/XML_Technical_Support_Guide_Final.pdf

My future plans for this contribution are:

  • Fancy up the 7 new UPS ServiceType Links, maybe javascript, maybe css.
  • Make it so the User data is entered/configurable thru the osCommerce back admin.
  • It would be nice if tracking number could be read from UPS’s AUTO XML IMPORT output file and inputted in order comment and customer notified.
  • Some of the options are still hard coded into this contribution… ie/ number of packages and anything I haven’t noticed.

ASP.net 1.1 Repeater Columns

While writing a script to mass approve posts on a site, similar to deleting all unwanted email using: a repeater (not a datagrid), a checkbox in each indexItem, and a button; I ran into a common problem for many… ASP.net repeaters don’t have columns. I searched the net and visited two of my favorite forums looking for help and came up with nothing…

Here’s my Psuedo/Logic:
1) Load Repeater with list of “UNmoderated” items
2) Put a checkbox inside the repeaters ItemTemplate
3) Add code to button (dosomething if checkbox is checked)

Problem:
I couldn’t locate the column with the PrimaryUniqueID because there are no columns in repeaters, but my Stored Procedure “requires” the PrimaryUniqueID.

Button code:
Private Sub MassApprove_Click(ByVal sender As System.Object, ByVal e As System.EventArgs) Handles MassApprove.Click
Try
Dim MyRptItem As RepeaterItem
For Each MyRptItem In MyRepeater.Items
Dim chbxMassApprove As CheckBox = CType(MyRptItem.FindControl(“chbxMassApprove”), CheckBox)
Dim PrimaryUniqueID As String = MyRptItem.DataItem(PrimaryUniqueID) PROBLEMATIC LINE
If chbxMassApprove.Checked = True Then
‘DO THE MASS APPROVE
‘LOOP THRU STORED PROCEDURE
End If
Next
Catch exc As Exception
Response.Write(exc.ToString)
End Try
End Sub

Solution:
I used this as a workaround if this helps anyone…

Front End:
Text='<%# DataBinder.Eval(Container, “DataItem.PrimaryUniqueID”) %>’

Back End:
Dim PrimaryUniqueID As String = ckbxMassApprove.Text.ToString

Code Commenting

I recently took full control of a clients website.  And as I was doing a few requested changes, I kept running into coding difficulties.  My main problem was that I had to spend a substantial amount of time figuring out what was changed for what reason.  If not do it for the next webmaster :), do it for yourself… comment on your coding. A nicely documented page of code will always be read twice as fast!

Useful information

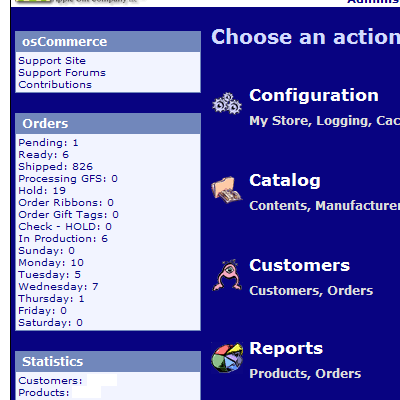
By default the osCommerce team have put some very useful information regarding your shop’s order on the admin index page (no longer used in osCommerce RC1)…

os_useful_1.gif

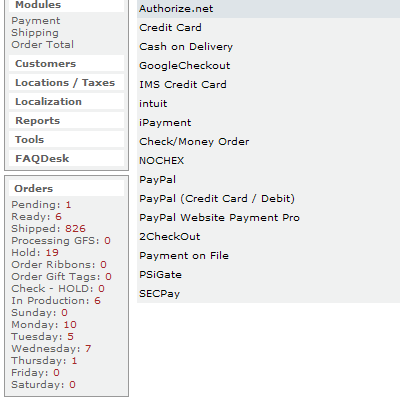
But once we pass this page, that useful information is gone. So I did a little editing… the end result is everywhere within a shop’s admin section you’ll have access to that information…

os_useful_2.gif

The modification is very simple. It is now a contribution on the osCommerce website, here.

ASP.net Paging

So, the users of a certain website of mine have been requesting that I add paging to one of my controls. I initially didn’t want to do it, not because I couldn’t do it. But because the control didn’t really call for it. But they are my users, without them the site wouldn’t be there right? So I went ahead with it. Its been a while since I used any paging code, so I was refreshed after reviewing ASP.net paging webcontrols:

System.Web.UI.WebControls.PagedDataSource

What we have to do for us to paging through our data vs. displaying all of it at once? We simply inject the paging into our data before displaying it. In my case, I am using a repeater:

'get the data
Dim myData As System.Collections.ArrayList
myData = ** myStoredProcedure **
'ensure there is data to work with
If myData .Count > 0 Then
'create a new instance of PagedDataSource
myPagedDataSource = New System.Web.UI.WebControls.PagedDataSource
'set my pagin preferences
myPagedDataSource.DataSource = myData
myPagedDataSource.AllowPaging = True
myPagedDataSource.PageSize = 5
myPagedDataSource.CurrentPageIndex = myCurrentPageIndex
'then finally bind the data to my repeater
myRepeater.DataSource = myPagedDataSource
myRepeater.DataBind()
End If

Quite simple to use. Knowing that the webcontrol is there really is the hard part of it all.

Cheap Linux Hosting

Below are my recommendations for cheap reasonable, reliable website hosts:

Lunarpages.com
+ Affordable Plans ($6.95 monthly)
+ Decent Support
+ Linux and Windows Hosting ($8.95 monthly)
++ (10) Free Addon Domains
++ WHM (web hosting manager)

Siteground.com
++ Affordable Plans ($5.95 monthly)
++ Excellent Support
– Linux Only Hosting
– – Only (1) Domain

Hostgator.com
+ Affordable Plans ($6.95 monthly)
+ Decent Support
– Linux Only Hosting
++ Good Reseller Plans
++ WHM (web hosting manager)

Godaddy.com
++ Dirty Cheap Hosting ($3.99 monthly)
– – Poor Service
– No cPanel
++ Up-to-date Software

Please note that it really depends on what your goals are and what you need your site to do. Give me a ring if you can’t decide or need help.

System Recovery

The perfect Microsoft setup? Is there such a thing? Yes, if you plan ahead of time for disaster. What am I talking about? System recovery is today’s topic.

The best way to prepare for a failing system is to separate the “system” and “storage”. Why? With the system and storage separated, we can do anything to the system and at the same time preserve our stored data. I have been SEPARATING the two for a while for all friends and family members that have totally missed up their systems. Does the system have to be totally wiped? No, that’s about the only time users will seek help. The process is pretty simple but very effective:

Separation in Bios – here we make to physical partitions out of one hard-drive

  1. Boot from you favorite OS CD, mostly a Microsoft OS
  2. Wipe out the whole hard-drive
  3. Create 2 or more partitions, the first partition should be C: and at least 10GB (more if you have a bigger HD)
  4. Install the OS on that partition

Separation in OS – here we make use of the second partition

  1. After everything is done, login into OS
  2. Open “My Computer”, right click C: drive, rename it to “System”
  3. Right click to rename the other drive to “Storage”… you may have to format it
  4. Exit everything, right click “My Documents” properties
  5. Click on “Move To”
  6. Browse to your “Storage” drive/partition, make a folder, select it

That’s about it. What we did was first made to partitions, on for the operating system and one for storage. Just in case the OS needs to be fixed. With there being a drive just for the OS, if needed it can be wiped without messing with the personal data.

But for all this to work, the user MUST NOT save any important data on the C: drive. Thanks to Microsoft’s design, personal data is sent is mostly sent to “My Documents”, which we move to the “Storage” partition.

We can go further by cloning our “System” partition, but that’s other article.

Free Dotnetnuke Skins

I wanted to have freedotnetnukeskins.com up and running by November 1, 2007. But with the way things are going with Lunarpages.com… I am going to have to wait until 2008.