Fortinet VPN Tunnel (Client Remote Access)

If you failed at setting up a Fortinet VPN Tunnel and don’t have a subscription with Fortinet this post is for you!

After setting up my AD at home with Enterprise grand networking, I set up a remote site at the “in-laws” with the 2nd DC. With both sites having Fortigate firewalls, I setup a IPsec Tunnel (site to site) between the two.

The next step was suppose to be easier, “Remote Access” to the home lab domain. It wasn’t as easy as I thought, I almost called this post, “When Cookbooks have bad recipes!”

Fortinet even has a recipe for it: https://docs.fortinet.com/document/fortigate/6.0.0/cookbook/786021/configuring-the-ipsec-vpn.

Two things I missed because the instructions weren’t clear (at least for me):

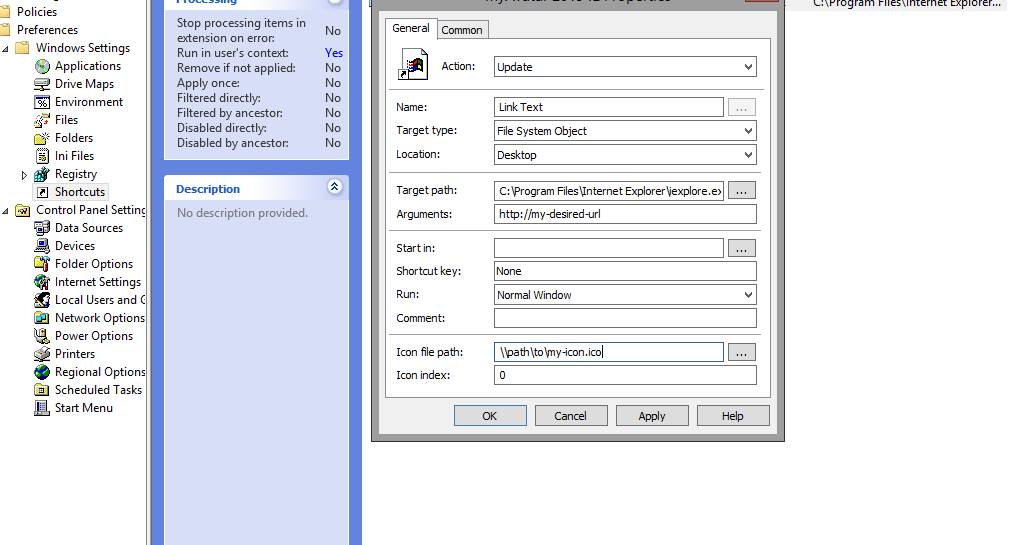
1. ” Configuring the IPsec VPN, Step 6: Enter a Client Address Range for VPN users. The IP range you enter here prompts FortiOS to create a new firewall object for the VPN tunnel using the name of your tunnel followed by the _range suffix (in the example, IPsec-FCT_range).”

FortiOS provides these addresses dynamically. Put in a “new range” that doesn’t exist!

2. ” Configuring the IPsec VPN, Step 10, In the Peer ID field, enter a unique ID, such as dialup1.”

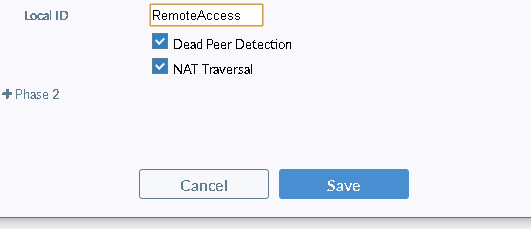
This is important if you have other tunnels. “FortiOS will get confused where the traffic is coming from and going to without the [Peer ID].” Here I gave it “RemoteAccess.”

Configuring FortiClient, Step 4: Expand Advanced Settings > Phase 1 and in the Local ID field, enter dialup1.” This same ID is needed on the Remote Clients configuration as such:

Hope this helps someone else.

Browser Specific Shortcut GPO

I recently had to target IE for a certain link. There were great examples to be found. But here is my version:

Create a new GP

Right-click on your GPO and select edit
Expand User Configuration > Preferences > Windows Settings
Select [Shortcuts]
Right-click in the empty space and select new > [Shortcut]

Action > What’s best for your situation
Name > Your link text
Target type > File System Object
Location > Desktop
Target path > C:\Program Files\Internet Explorer\iexplore.exe or another browser
Arguments > URL that you need to open

Firefox Spell Checker

Why isn’t it more obvious? I just literally spent 10min looking to turn Firefox’s spell checking abilities on then remembered that all you need to do was install a dictionary of the language I wanted to have it spell check. Duh? No, because if you look through Firefox’s options, there is no reference to it’s spell checker. Also if you googled: firefox spell checker, you’ll get links going to outdated spell checker prototypes and tutorials. Granted that I am a computer geek, we do get old and forget things. 🙂 Additionally, if Firefox’s spell checker is intuitively integrated, shouldn’t the default language’s dictionary be intuitively integrated as well? I think so!

I hope this post is useful to someone somewhere.

Here’s the link to the English Dictionary… click me.

Vista and Toolbars

Since XP, I have come to depend an autohide toolbar to access programs quickly and easily. But after switching to Vista, that easily made toolbar took a little work to make. If you are looking to make a toolbar in Vista, here are the steps:

1) Make a folder (it can’t be deleted)
2) Put all your shortcuts into it
3) Drag the folder to the edge of your screen where you want the toolbar to go
4) Customize it

Hope that helps,
Thuan

Using BitTorrent

Before you read on, please note that to understand this article you must have some knowledge about peer to peer (P2P) file sharing and/or have used some sort of P2P file sharing program. In this article I will compare the steps needed to start/use/download while using these types of programs.

Why use BitTorrent? The advantage with using BitTorrent is our downloads can (and for the most part will) reach much higher speeds resulting in faster downloads.

Using torrents is like using any other P2P programs. If you have used any programs such as LimeWire, then you are 90% of the way there. How’s that?

Lets start by reviewing how we would use a program such as LimeWire:

bt_limewire

1. Start the program
2. Search for your desired files
3. Select and start downloading

Simple? Yes. Well using BitTorrent software is almost exactly the same. The only difference is the manner in which you do step 1. Here’s a breakdown of the steps for BitTorrenting:

bt_utorrent1

1a. Open your favorite web browser
1b. Go to your favorite bit torrents site
2. Search for your desired files
3. Select and start downloading

What? That’s it?! Yes, do you see the difference?

The only thing different is programs like LimeWire automatically connects to the file sharing network for you. This way all you have to do is start searching for what you need. BitTorrent software doesn’t work in that manner. Instead of starting the BitTorrent software you start up your browser then visit your favorite torrent sites. I say your favorite torrents site because there are many of them.

Once you click download this using torrent… your torrents software should start automatically for you. If you don’t know which torrent software to use, then take my advice and use uTorrent. I have used many and IMHO it is the best in regards to speed, usability, and configuring.

As with all related “downloading” off the internet. Be sure to filter through the search results for virus spreading fakes. And to be really sure, scan for viruses after downloading your desired files before opening them. This is probably the #1 reason why everyone gets those “I don’t know what happen?” to my computer viruses and spyware. 🙂

Oh, BTW, LimeWire has BitTorrent software built into it… however, I don’t suggest using it.

Also, if it isn’t so obvious… when you are on a BitTorrent website you’ll see unfamiliar terms such as “seeds and leechers”:

*Seeds, the number of people that are sharing the complete file.
*Leechers, the number of people downloading and sharing some of the file… you share what you downloaded thus far.

Hope this helps.

-Thuan

Stop Unwanted Auto Startup(s)

It’s time to bring back an archaic (at least for me) utility. The utility of topic is your “System Configuration Utility.” I recently needed to use it to prevent an annoying “HP Update” program from starting up. You can find it via your run command line.

Start > Run

run_start

Type “msconfig”, Press ‘Enter’ OR Click ‘OK’

run_type

Choose The “Startup” Tab

run_msconfig

If it isn’t self explanatory, in that tab is the list of programs that are set to automatically start after Windows starts up. Simply uncheck the programs that you don’t want to start then press ‘OK’.

*You’ll get a dialog box/message asking if you want to restart or not, that choice is yours.
*You’ll also get a message after your machine starts up again stating that something has been changed.

Give it a try, but don’t over do it. My advice is to only uncheck obvious annoyances.

Right Click to Copy or Move Files

I needed an easy way to copy or move files from one directory to its parent directory, but couldn’t find a feasible way of doing it. However, along the way I found a very useful XP / Vista tweak. This tweak allows us to  copy or move files to other directories using a directory browser… via right click.

Here’s the article I ran into that explains how to do it…

http://www.howtogeek.com/howto/windows/add-copy-to-move-to-to-the-windows-explorer-right-click-menu/

It involves editing your registry. New to editing your registry? No problems, there’s an “edit registry via double click” version…

http://www.howtogeek.com/howto/windows-vista/add-copy-to-move-to-on-windows-vista-right-click-menu/

Many thanks to The Geek.

nLite = Windows Deployment

nlite

Well it has been a couple of years since I did any real System Administration work but if I were to have the duty of deploying multiple machines again… nLite would be the first piece of software I would turn to.

It has saved me hours, virtually everything can be pre-configured before the OS is installed allowing an “unattended” install like no other.

I did run into two errors that I would like to mention.

1) If you pre-configured the display options, ie your theme… it will not be the labeled “yourTheme” as desired, but it’ll be “nLiteTheme”. And it could possible be all messed up as mine came out. And the problem wasn’t easy solved as setting the display to another theme. You actually have to go into the system folder and delete that “nLiteTheme” to fix the problem.

2) If you are installing the OS onto a machine that requires a 3rd party SCSI adapter (F6 Method), you might run into problems. For me, I kept getting an error saying that I was missing the required SCSI driver, but in fact the driver was installed.

Needless to say, other than those two errors. This piece of software has same me much time. So if you’re looking for a stress-free install, give it a consideration. And there’s a Vista version… vLite.Oh, one more thing… they are both free!

Set Up Your Computer To Receive and Send Faxes

I was at the store the other day and noticed that people still buy fax machines. Instantly, I thought to myself, “Wow, are you kidding me?” At our technological state, we should all have the necessary components to configure our computers to receive and send faxes.

Here’s what you’ll need to receive and send faxes (bare minimum)*…

  1. A computer with Windows XP or Vista on it
  2. It has to have a modem
  3. A phone line

*To send paper documents, you’ll need a method of getting the desired fax documents to your computer, ie a scanner. If the documents are already on your computer than you won’t need that scanner.

Here’s how to setup your computer to receive and send faxes (straight from Microsoft)…

XP –> http://www.microsoft.com/windowsxp/using/setup/hwandprograms/printfaxscan.mspx#3

Vista –> http://windowshelp.microsoft.com/Windows/en-us/help/488ac4fb-7436-4a03-bb70-6ded839dd3c21033.mspx

After everything is up and running, you’ll need to test your setup; luckily, there’s a free service that you can use…

http://www.interpage.net/sub-wwwfax.html

Good Luck.

XP AntiSpyware 2009 Removal

Not too long ago a close buddy of mine, got his computer infected with a virus. Only because a message popped up saying his computer was infected and that he should run a scan. Little did he know that the alert was a fake. It was actually the virus asking for permission to install itself on his computer. Needless to say… even if you aren’t tech savvy you need to know what is and isn’t installed on your computer. In the end I got the virus off for him and his system was saved but it took some work to get rid of it.

Okay, enough rambling. It’s called XP AntiSpyware 2009. It is disguised as a real anti-spyware program…

What it does is sends out fake alerts urging you to fix your computer. Be alert. If it gets access to your system, porn links and the such will abound your desktop.

There is software on the net to remove it, but the only one I was able to find to actually work and for free is this one… Malwarebytes’ Anti-Malware. So, if you run into the mentioned virus, give it a try.

-Thuan